Saturday, May 27, 2017

Making “The Quintet” Altered Reality
The Quintet

I took a photograph of my collection of wooden bird sculptures with the idea of creating a new acrylic painting. When I cut the figures out and placed them in a 20 x 16 canvas, I changed my mind and decided to go nuts!

The first thing I did was to create the 20 x 16 canvas then crop the image to fit nicely onto the canvas then make a duplicate layer.  I cut out the birds using Topaz Remask with the result replacing the duplicate layer.  I deleted the original layer then moved the duplicate layer to the upper half of the canvas.
The birds are standing in water so a copy of Layer 1 is renamed Layer 2, rotated 180 deg., then flipped horizontally.  The layer is then moved down to line up with the legs in Layer 1.  Finally, Layer 2 brightness is reduced.
Layer 1 is selected and the magic wand outlines the birds.  A background image is loaded copied then special pasted into creating Layer 3 with Blend Mode set to Overlay.  The sky brightness and contrast is adjusted so that the birds stand out.  Layer 3 is moved above the locked background layer which has been disabled.
Layer 2 is copied and renamed Layer 4.  The birds are isolated with the magic wand tool.  Edit-Fill-Color is selected with a dark blue.
Duplicate layer 3 and rename to Layer 5.  Flip Layer 5 180 deg., then move it over the refection.  Set the blend mode to Lighten and reduce the opacity by about 60%.
We need a brick wall to separate the water from the sky.   I chose a photo of a stone wall and copied a section out with a narrow sized rectangle marquee tool, then pasted it onto Layer 3 positioning it to be above the line between sky and water.  This layer is renamed Layer 7.

The water has a nice reflection but it needs to be contrasted with an opposite color.  I chose an image of a flowing river and cut out a section with the rectangle marquee tool and pasted it over Layer 5.  I changed the blend mode to hue and opacity to about 66%.   The layer is renamed Layer 6 That completes “The Quintet”. See first image.
Layer order in Photoshop

I shoot walls, tree trunks, gates, lamps, clouds, cloth, etc. and keep them in a folder “My Textures” with subfolders to identify each group.  When the time comes I have an image to use to make something for  “Altered Reality”.  


Monday, May 22, 2017

Cool Birds of Spring

Gray Catbird

The best time of the year to photograph birds is during the migration periods which occur in the spring in Northern Illinois.  The birds breed during this time period then move up north to Canada and beyond.  There are species who nest for a short period of time and some just passing through.

My equipment is simple, a Sigma 150-600 zoom lens attached to a full frame D610 DSLR mounted on a mono pod. Trying to steady and focus this camera and lens combination by hand can be difficult to do and tiring. The mono pod is easier to control than a tripod and easier to carry when walking through fields and woods.  Some days are better than others.  Low wind speeds and partly cloudy or light overcast skies are ideal lighting conditions for capturing birds. 


The Gray Catbird above was a surprise to find since I never saw one before. The Catbird can be detected by its down slurred mew call, reminiscent of a cat’s meow. A chunky, medium-size bird, no other North American bird has a uniform dark gray plumage. Sexes are similar. Body entirely dark gray, with black cap, black tail, and chestnut under tail coverts.  I found this bird on a tree branch but are usually found in leafy thickets along the edges of woods and streams, shrubby swamps, overgrown brush fields, and hedges in gardens. When Brown-headed Cowbirds lay eggs in nests of this species, the cowbird eggs are usually punctured and ejected by the adult Catbirds.  Ref: http://www.audubon.org/field-guide/bird/gray-catbird

Wood Thrush

The Wood Thrush was another surprise.  I was on a back trail through the woods near the Du Page River.  Wood Thrush like deciduous forests with tall trees; more abundant in damp forest and near streams. What is sad is Cowbirds lay many eggs in their nests, so the thrushes raise mainly cowbirds with only a few of their own.  Ref:  http://www.audubon.org/field-guide/bird/wood-thrush   Thus, declining numbers. Yep! Getting hard to find. This reclusive bird's cinnamon brown upperparts are good camouflage as it scrambles for leaf-litter invertebrates deep in the forest, though it pops upright frequently to peer about, revealing a boldly spotted white breast.  Ref: https://www.allaboutbirds.org/guide/Wood_Thrush/id


Spotted Sandpiper

Walking along stone pavers on the shoreline of the Du Page River at the Churchill Forest Preserves there was a small bird drinking water on the stone.  The Spotted Sandpiper is a migratory bird.  Their breeding habitat is near fresh water across most of Canada and the United States. They migrate to the southern United States and South America, and are very rare vagrants to Western Europe. These are not gregarious birds and are seldom seen in flocks.  Ref: https://en.wikipedia.org/wiki/Spotted_sandpiper


Of course, looking for birds along the river you will also find the usual suspects, geese and ducks!


Thursday, May 4, 2017

Flower Photography – Getting Close


This year, the spring flowers are showing off dazzling displays of color and form.  Besides backyards, there are roadsides, parks, botanical centers, and even indoor events.  Many images of flower beds are taken for one reason or the other but what I especially like to photograph are the color contrasts, shapes, and shadows of blooms close up.

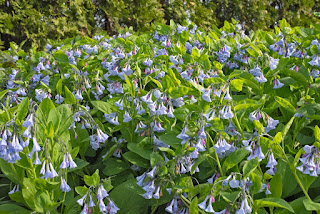
A bed of Blue Bells


The best time to take photographs of flowers is at dusk and dawn.  Skies with a light overcast during the day helps reduce overexposed highlights.  Under bright sunlight you could use a hand held reflector to direct light to lighten shadows or a screen to shade or tone down the brightness of the sunlight. 

Dark Screen for shading


The screen I used is a shade for rear windows in an automobile to filter the bright sunlight for your passengers.  It is hand held about a foot or so from the flower.


Using dark screen to shade flower
No screen used,. Over bright flower tips


When the dark screen hovers over the flower the brightness of the edges of the flower become reduced allowing detail of the flower edges to appear. These images are shot in Aperture mode. The ISO setting was automatically adjusted to compensate for the reduced light.

Close up to show detail of the brighter edges with the dark screen

Water was sprayed on the this tulip to
show interest in this side shot.
 Interesting interior on top of this flower 
There are plenty of images of flowers taken only on the top and centered.  Images with a lot of interest in color or shape exhibited within the top of the flower are ok for this approach.  Consider examining the entire flower, the sides, the bottom, or at an angle to show off the flower’s beauty. 


Another point of consideration is composition. Rule of thirds, Dynamic Symmetry, and balance play an important role when composing and cropping flower images just like all photographs should have. 

You can also take extreme close ups for abstraction, add textures, and other techniques in post processing.

The important thing is take your camera out of the closet and shoot some of your own fine art flower photography.

Snow Bells